
:::Mystic Eye Candy:::
Tut by Juicy Bits on February 17, 2010.
This tut was written in PSP X2Ultimate for those familiar with the language and workings of PSP and PSP Tutorials.
-Supplies-
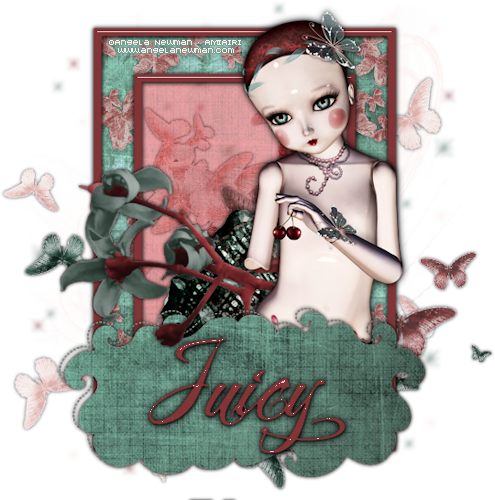
Artwork by Angela Newman
Myst kit by Juicy Bits
{You will need: (1) Tag, (1) Shell, (1) Flower, (1-3) Butterflies, (2) Papers}
Mask of Choice
Sparkles or Brushes of Choice
Mura Meister Copies
Any desired filters {I utilized filters from Eye Candy 6}
-Instructions-
1. Open up a new 500 x 500 image.
2. Select one color from your tube in your foreground. Set your background to transparent.
Take your rectangle tool, set desired width {10.00} Drag out a rectangle and align to center of canvas.
Rasterize layer. Repeat with a smaller rectangle. Merge these two layers. Apply any desired filter. {EC6 - Glass}
This will be your frame layer
3. Paste your tube as a new layer. RPAD {I did not resize}
4. Paste tag as a new layer. Resize and Place As Desired (RPAD).
5. Go to your bottom layer. Paste your paper as a new layer. Go to your frame layer.
With your magic wand click in between your frame rectangles. Expand your selection by 5.
Return to your paper layer. Invert selection and delete.
6. Go to your frame layer. Paste shell as a new layer. Go to your paper layer.
With your magic wand click on the inner empty space. Return to your shell. Invert selection and delete.
7. Paste your flower as a new layer. RPAD. Duplicate this layer. Move your duplicate layer to the top.
Add desired shadow and erase parts as desired. {parts over the tube}
8. Go to your bottom layer. Paste your first butterfly. Resize as desired. Apply desired Mura Meister Copies setting {Preset - Star Cluster; Number 12 - 16; Size - 0}
Repeat with different butterflies as desired.
9. Paste desired paper as a new layer. Go to your original paper layer and with your magic wand click on the inner empty space.
Go back to your new paper layer. Invert selection and hit delete. Set the opacity of this layer to 50.
10. Go to your bottom layer. Add a new raster layer. Use desired brushes and sparkles.
Feel free to play with opacity settings. You can even duplicate and blur layers for a softer glow look.
11. Add shadow to layers as desired.
12. Resize your tag now if desired. Add desired text and copyrights. Save as a PNG.
Tut by ©JuicyBits 2010. Any similarity is purely coincidental. Do not redistribute or claim as own.
Copying or "Reproducing" and claiming as your own tut is STEALING and ILLEGAL.


No comments:
Post a Comment