Showing posts with label Vinegar. Show all posts

Tuesday, December 15, 2009

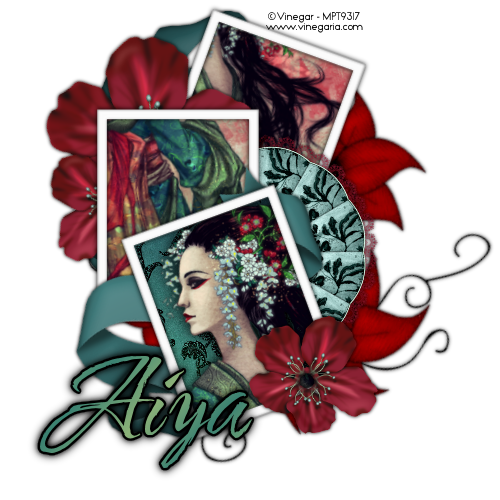
:::Geisha:::


:::Geisha:::

Tut written by Juicy Bits Dec 15, 2009. This tut was written in PSPX2 and is written for those familiar with the workings and language of PSP tutorials.


- Supplies -


Image & Tube by Vinegar at MPT

My frame HERE.


(You will need, (1) Paper, (1) Ribbon, (1) Fan, (1) Flower, (1) Flower Cluster (Flower07)


- Instructions -

1) Open your supplies and minimize. Open the frame template I have supplied for you. Shift-D. Close your original.


2) Resize the backing and frame layers by 50% (make sure your 'resize all layers' is NOT checked)


3) Duplicate each of these layers twice. Designate one set as "2" and the other duplicate set as "3".
Make sure your original layers are at the top. *Backing still beneath the frame.
Arrange each of these sets as desired. See tag for my arrangement. (I rotated left and right by 20%)

4) Go to the backing layer at the bottom. Paste your image as a new layer.
Rotate and place as desired. Go to backing layer. Select all/float/defloat. Return to image.
Invert selection and hit delete. Repeat the process for the backing layer in the middle.

5) Go to your top backing layer. Paste the paper of choice as a new layer. Go to top backing.
Select all/float/defloat. Return to paper. Invert selection and hit delete.


6) Paste your tube as a new layer. Arrange as desired and give desired shadow. Go to top backing.
Select all/float/defloat. Return to tube. Invert selection and hit delete.


7) Go to your bottom frame layer. Paste ribbon as a new layer. Resize and place as desired.
Duplicate your ribbon and move duplicate layer to just below your top backing (Backing1).
Resize and arrange as desired. Add drop shadow to both ribbon layers..

8) Paste your fan as a new layer. Rotate, resize, and place as desired. Add drop shadow.

9) Paste your Flower Cluster. Rotate, resize and place as desired. Add drop shadow.


10) Go to your bottom Frame. Paste your flower as a new layer. Resize but keep rather large.
Duplicate the layer. Resize to a smaller size and place slightly staggered from the larger flower.
Duplicate this layer and send to the top. Place in the corner or as desired.
Add shadows to all three of these layers.


11) Add desired shadows to your three frame layers. Merge Visible. Resize if desired.


12) Add credits and desired text. Merge Visible and Save as PNG


Enjoy!


Tut by ©JuicyBits 2009. Any similarity is purely coincidental. Do not redistribute or claim as your own.
Copying or 'Reproducing' and claiming as your own tut is STEALING and ILLEGAL.


Wednesday, November 18, 2009

:::Belle:::


"Belle"
This tut was done with PSP X2 and is for people with working knowledge of PSP who are familiar with PSP tutorials and their language.


-Supplies-


Kit - "Bella's Bedroom" by Me : Frame01, Glitter03, Paper03,


Tube - "Twilight" by Vinegar at MPT


Mask & Brushes of Choice (WeeScotsLass Mask 50)


-Instructions-


1. Open your supplies and minimize


2. Open a new 500 x 500 transparent image.


3. Paste your frame and resize this layer only by 80%.


4. Paste tube, resize and place as desired. Duplicate Tube layer and move duplicate below frame layer.


5. Go to your top tube layer. Duplicate layer. Set duplicate to "Screen". Merge down.


6. Click on your very bottom layer (which should be empty) and paste Glitter 03. Resize and arrange as desired. Duplicate, Mirror, Flip and Merge Down.


7. Paste Paper 03 Go to frame layer. Take your magic wand and click OUTSIDE of the frame. Expand your selection by 2 and invert selection.
Return to your paper layer and invert selection. Hit delete.


8. Go to your tube layer. Add a new raster layer. Use desired brushes in desired color (I used colors from the tube) resize and arrange as desired.
You may want to do this in several layers.
Adding a new layer for each brush. This makes it easier to arrange and easier to remove brushes that may not work later on.
You may arrange these above and below your tube layer as desired.


9. Go to your bottom layer. Select two different colors from your tube and create a gradient with these settings: Radial/Angle312/Repeats9.
Floodfill your bottom layer and apply your desired mask.


10. Apply desired shadows to all layers EXCEPT tube & mask layers.


11. Apply shadow (make sure "on separate layer" is checked) to your top tube layer. Duplicate the shadow layer. Adjust Gaussian Blur 4.00.
Merge your top tube layer down to your shadow layers.


12. Duplicate your shadowed frame. Select, float and defloat the duplicate frame. Keeping your selection intact, go to your top tube layer and erase
desired parts. (Tube over hangs etc,)


13. Deselect and delete duplicate frame. Go to your mask layer.


14. Make sure your mask has room for a shadow to prevent jagged cutoffs in the tag. Duplicate mask layer. Go to original layer (bottom) apply shadow.
Go to duplicate layer and set to Hard Light.


15. Merge and resize if desired. ALWAYS resize BEFORE adding credits and text. Add credits and save your base.
From there you can add any desired text or name.


Enjoy!


Tut by ©JuicyBits November 18, 2009. Any similarity is purely coincidental. Do not redistribute or claim as your own.
Copying or 'Reproducing' and claiming as your own tut is STEALING and ILLEGAL.


My name is Aiya. I've been psping for about 4 years. I'm currently creating exclusive scrap kits at AMI.
I also design for my own store Juicy Bits, as well as Twilight Scraps & Scrappetizing.
Below, you can find links to these stores as well as my blog.
If you'd like to contact me, please email me at myjuicybits@live.com.


Labels

Angela Newman (1) Elias Chatzoudis (1) Gorjuss (1) Ismael Rac (6) Vinegar (2)

Fanatics, Stalkers & Other Fab People